Update: See out new tutorial for trunked radio tracking, including digital voice trunked tracking.
The RTL-SDR software defined radio combined with SDRSharp, and a program called “digital speech decoder” (DSD) can be used as a radio scanner to easily and cheaply listen to unencrypted digital radio voice conversations.
Digital radio voice communications are becoming more commonly used in the radio spectrum. This is due to the various improvements offered over traditional analogue voice radio systems. Unfortunately for radio scanner hobbyists, digital radio is difficult to receive, as special radio scanners which can be expensive are required to decode the digital signal. Additionally, digital radio systems can be encrypted making it impossible for communications to be decoded by a hobbyist. However, most users of digital radio do not bother to encrypt their systems as it can introduce lag and extra battery drain in portable radios.
The most common digital speech codec is APCO P25, which DSD is able to decode. DSD is also capable of decoding other common digital codecs such as DMR/MOTOTRBO and ProVoice which no hardware scanner is currently capable of.
Super cheap software radios such as the RTL-SDR can be used to decode these digital voice communication signals instead of expensive radio scanners. While this tutorial is aimed at the RTL-SDR, other software radios such as the Funcube dongle, HackRF and BladeRF will also work. Hardware radios with discriminator taps may also work.
Examples of DSD Decoding Digital Voice with RTL-SDR as a Radio Scanner
YouTube user Geoff Wolf shows a video where he uses RTL-SDR as a police scanner to listen to public safety P25 digital radio using DSD, SDRSharp and virtual audio cable.
Image may be NSFW.
Clik here to view.
YouTube user Superphish uses RTL-SDR as a radio scanner to decode MOTOTRBO digital voice of a taxi company, using DSD, SDRSharp and virtual audio cable.
Image may be NSFW.
Clik here to view.
Tutorial – Decoding Digital Voice using SDRSharp, DSD and RTL-SDR (For Windows)
It is assumed you have an RTL-SDR dongle set up and working with SDRSharp. If not, see the buy RTL-SDR, and quickstart pages first before attempting this tutorial.
First, you will need to download the lastest DSD 1.6 version and extract the zip file or place the exe into a folder. Download the latest “Windows Port with P25/DMR Filter”.
Update 25 Feb 2014: Note that there is also the still in development DSD 1.7 available which can also decode D-STAR voice. DSD 1.7 needs to be manually compiled first. These links can help you to compile it for Windows and Linux. There is also DSD+ now available which has much improved P25 and DMR decoding, especially for weak signals. DSD+ download and instructions can be found here. With DSD+ the installation of Cygwin shown in this tutorial can be ignored, but pay attention to the steps needed to download lame_enc.dll on the above link.
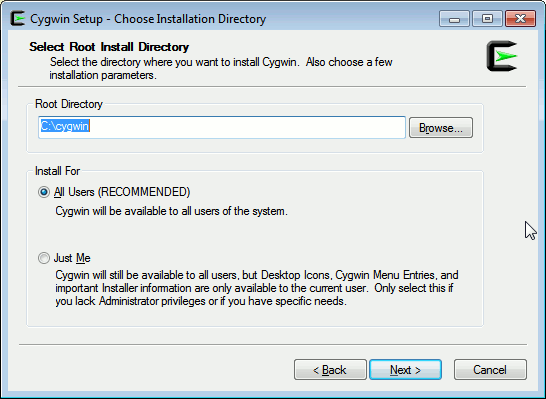
Next, if you don’t have Cygwin installed, you will need to go to www.cygwin.com. Download and install the 32-bit version of Cygwin. Even if you have a 64-bit PC, you should use the 32-bit version of Cygwin as DSD is a 32-bit program. You can use the default install options, but make sure you record what “Root Directory” your Cygwin is being installed to. I just install to “c:\cygwin”.
Image may be NSFW.
Clik here to view.
Once installed, navigate to the root directory folder where Cygwin was installed to. Open up the “bin” folder, and find the file “cygwin1.dll”.
Image may be NSFW.
Clik here to view.
Copy and paste this file into the DSD folder.
Image may be NSFW.
Clik here to view.
You will also need an audio piping utility such as virtual audio cable. (The trial version of virtual audio cable may work, however a watermark sound is played periodically which could cause a bad decode). You can also use the free VB-Cable as a virtual audio cable alternative. Also ensure virtual audio cable or VB-cable is set as the default recording audio device in windows sound properties as DSD will use the default sound device.
The sampling rate of your audio piping method must be set to 48000 samples/sec. To set this in Windows, right click your device in the Windows sound recording tab, go to properties and under the advanced tab, set the sample rate to 48000Hz. Do the same to the same device under the Playback tab as well.
Image may be NSFW.
Clik here to view.
Also, in your SDRSharp folder, open SDRSharp.exe.Config in a text editor such as Notepad, and ensure the key minOutputSampleRate has a value of 48000 such that the line reads as <add key=”minOutputSampleRate” value=”48000″ />.
Image may be NSFW.
Clik here to view.
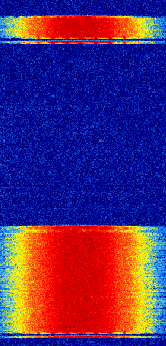
If you are unfamiliar with what a digital voice signal may look like, two waterfall examples are shown below, with audio examples.
P25 (LEFT)
DMR/MOTOTRBO (RIGHT)
Image may be NSFW.
Clik here to view. Image may be NSFW.
Clik here to view.
Now to decode the digital voice signals follow these instructions.
- Open SDRSharp and set the audio output to virtual audio cable or VB-cable.
- Set the receive mode to NFM, with a bandwidth of about 12.5KHz.
- Tune to a digital voice signal frequency. You will need to Google for these frequencies by your location. The radioreference databases may be a good place to start looking for these frequencies. Most digital voice frequencies will be around 850 – 900 MHz.
- Open a command prompt from Start->All Programs->Accessories->Command Prompt, and navigate to the folder where DSD is located. For those who are not familiar with the command prompt, use the “cd” command to change directories within command prompt. For example, if your DSD folder is located in c:\Radio\DSD, you would type in command prompt “cd c:\Radio\DSD”.
- Type in “dir” to show a list of files in the current directory, and look for the name of the DSD .exe file. Now type into the command prompt the file name of the DSD .exe file, which at the time of writing this article is “dsd160″, and then press enter to start decoding.
At this point, text should be scrolling through the command prompt window when a digital signal is broadcasting. Whenever someone speaks into the radio you should see the words “voice” in the window, and hear voice.
Image may be NSFW.
Clik here to view.
If the word voice is constantly showing and a garbled sound is playing, you may be listening to an inverted DMR/MOTOTRBO signal. Try typing “dsd160 -xr” into the command prompt at step 5 instead. More DSD options for other digital signals can be found by looking at the DSD help screen by typing in “dsd160 -h”.
To get good decodes (for most soundcards), the volume settings in SDRSharp and Windows should be played with until “inlvl” reads at approximately 30% for best performance. Note that all soundcards are different, and DSD may get better performance at a different percentage on your computer.
To stop DSD, simply press “ctrl + c” at the command prompt while it is running.
Some Tips
- If you don’t know what P25, MOTOTRBO, ProVoice or any digital voice signals sound like, this page has some more example audio files.
- You can simply manually scan through various signals, and see if DSD starts scrolling text to see if a signal is supported. DSD will start attempting to decode immediately. Note however that DSD will also scroll text on trunking channels, but will not be able to decode them. See the next section for information on decoding trunking channels.
- A strong signal is required for DSD to decode audio well. Ensure you are using a good antenna and have set the RTL-SDR gain correctly.
- DSD will listen to the default windows sound recording device. Make sure virtual audio cable or VB-cable is set as the default device. No text will be scrolling within DSD if the wrong audio device is used.
- Stereo mix can be used, but you will be hearing both the digital signal as well as the decoded voice at the same time. Also, the decoded voice audio will be pumped back into DSD causing a detrimental feedback loop.
- DSD is software in development and may not perform as well as a commercial digital radio.
More Advanced Digital Radio Scanning
As digital voice uses a trunking system, unitrunker can be run along with DSD to follow conversations across channels. Suprisingly, only one RTL-SDR dongle is required. This allows RTL-SDR to work as a proper radio scanner which can follow conversations across frequencies.
A good write up of how this can be done is presented here, with example video shown by YouTube user jcims.
Image may be NSFW.
Clik here to view.
| Image may be NSFW. Clik here to view.  If you enjoyed this tutorial you may like our ebook available on Amazon. The Hobbyist’s Guide to the RTL-SDR: Really Cheap Software Defined radio. |
The post RTL-SDR Tutorial: Decoding Digital Voice (P25) with DSD appeared first on rtl-sdr.com.